
创建自己的 Docker 镜像
docker pull下来的镜像有时候不能满足我们的需求,这时候我们可以在这些镜像的基础上创建属于我们自己的镜像。
使用 docker commit 创建自己的镜像
执行docker run -it ubuntu:18.04 /bin/bash,进入容器后发现没有vim命令:
root# docker run -it ubuntu:18.04 /bin/bash
root@1d0e7bcf5430:/# vim
bash: vim: command not found
以此为例,我们来创建一个已经安装了vim命令的ubuntu镜像。
先在容器内安装vim命令:
1 | apt update && apt upgrade -y |
安装完vim命令后我们就可以将这个容器打包成自己的镜像了。
首先我们要知道容器的ID,使用docker ps -a查看:
root# docker ps -a
CONTAINER ID        IMAGE               COMMAND             CREATED             STATUS              PORTS               NAMES
1d0e7bcf5430        ubuntu:18.04        "/bin/bash"         2 minutes ago       Up 2 minutes                            vigilant_kapitsa
容器ID为1d0e7bcf5430,执行docker commit 1d0e7bcf5430 ubuntu-vim-1:18.04将容器打包成镜像。ubuntu-vim-1:18.04为容器打包后的镜像名称和标签。
使用docker images查看打包后的镜像:
root# docker images
REPOSITORY          TAG                 IMAGE ID            CREATED             SIZE
ubuntu-vim-1        18.04               ef1ded0d8102        12 seconds ago      191MB
ubuntu              18.04               d131e0fa2585        13 days ago         102MB
ubuntu:18.04为执行docker run自动pull下来的镜像,ubuntu-vim-1:18.04为我们docker commit创建的镜像。很明显ubuntu-vim-1:18.04的体积比ubuntu:18.04大,因为我们更新了软件(apt update && apt upgrade -y)并安装了vim(apt install -y vim)。
现在执行docker run -it ubuntu-vim-1:18.04 /bin/bash,进入容器后已经安装了vim命令。
使用 Dockerfile 创建自己的镜像
前面我们介绍了使用docker commit创建自己的镜像,除此之外我们也可以使用Dockerfile创建自己的镜像。
创建一个名为Dockerfile的文件,编写以下内容:
1 | FROM ubuntu:18.04 |
使用docker build构建镜像:
1 | docker build -t ubuntu-vim-2:18.04 -f Dockerfile . |
参数-t指定构建的镜像的名称和标签。参数-f指定构建镜像的Dockerfile文件,如果Dockerfile文件在当前路径下可以省略不指定。
使用docker images查看打包后的镜像:
root# docker images
REPOSITORY          TAG                 IMAGE ID            CREATED             SIZE
ubuntu-vim-2        18.04               2e2c1d07123c        3 seconds ago       192MB
ubuntu-vim-1        18.04               ef1ded0d8102        2 minutes ago       191MB
ubuntu              18.04               d131e0fa2585        13 days ago         102MB
ubuntu-vim-2:18.04为我们通过Dockerfile文件构建的镜像。
执行docker run -it ubuntu-vim-2:18.04 /bin/bash,进入容器后同样已经安装了vim命令。
创建自己的 Docker 基础镜像
上面介绍的都是在ubuntu:18.04这个镜像的基础上继续叠加创建的镜像。使用docker history可以查看镜像的历史操作记录:
root# docker history ubuntu-vim-2:18.04
IMAGE               CREATED             CREATED BY                                      SIZE                COMMENT
2e2c1d07123c        24 minutes ago      /bin/sh -c apt install -y vim                   59.5MB
5955d39b6725        25 minutes ago      /bin/sh -c apt update && apt upgrade -y         30.4MB
d131e0fa2585        13 days ago         /bin/sh -c #(nop)  CMD ["/bin/bash"]            0B
<missing>           13 days ago         /bin/sh -c mkdir -p /run/systemd && echo 'do…   7B
<missing>           13 days ago         /bin/sh -c rm -rf /var/lib/apt/lists/*          0B
<missing>           13 days ago         /bin/sh -c set -xe   && echo '#!/bin/sh' > /…   745B
<missing>           13 days ago         /bin/sh -c #(nop) ADD file:7ce84f13f11609a50…   102MB
可以看到我们在ubuntu:18.04镜像的基础上添加了第六层和第七层(从下往上数),生成了自己的新的镜像ubuntu-vim-2:18.04。
如果我们想要从第一层就开始自己创建,可以使用scratch镜像。scratch是Docker保留镜像,镜像仓库中的任何镜像都不能使用这个名字,使用FROM scratch表明我们要构建镜像中的第一个文件层。
创建Dockerfile文件,编写以下内容:
1 | FROM scratch |
在Dockerfile文件路径下执行docker build -t hello:1.0 .构建镜像。执行docker images查看镜像:
root# docker images
REPOSITORY          TAG                 IMAGE ID            CREATED             SIZE
hello               1.0                 3aedfc6e1ff4        3 minutes ago       4.75kB
ubuntu-vim-2        18.04               2e2c1d07123c        18 minutes ago      192MB
ubuntu-vim-1        18.04               ef1ded0d8102        20 minutes ago      191MB
ubuntu              18.04               d131e0fa2585        13 days ago         102MB
可以看到hello:1.0镜像的大小只有4.75kB,这就是使用scratch创建镜像的一个好处,我们可以根据自己的需求来制定镜像,尽量减少镜像的大小。
执行docker history hello:1.0查看镜像的历史操作记录:
root# docker history hello:1.0
IMAGE               CREATED             CREATED BY                                      SIZE                COMMENT
3aedfc6e1ff4        16 minutes ago      /bin/sh -c #(nop)  CMD ["/hello"]               0B
15ad555d6f11        16 minutes ago      /bin/sh -c #(nop) ADD file:68f5ca1511528e4f6…   4.75kB
这就是一个基础的镜像,但是如果需要基础镜像发挥更多的作用,我们还需要其他的工作。Docker中的容器运行在操作系统中,共享了操作系统的内核。对于在Mac、Windows平台下,则是基于Linux虚拟机的内核。而Linux内核仅提供了进程管理、内存管理、文件系统管理等一些基础的管理模块。除此之外,我们还需要一些Linux下的管理工具,包括ls、cp、mv、tar以及应用程序运行依赖的一些包。因此我们就需要首先构建一个Minimal的操作系统镜像。
创建 Linux 镜像:alpine
目前比较流行的rootfs应该就是alpine了,因为他的体积特别小,最简单的环境只需要5M,下面是他的目录结构,下载地址在这里。
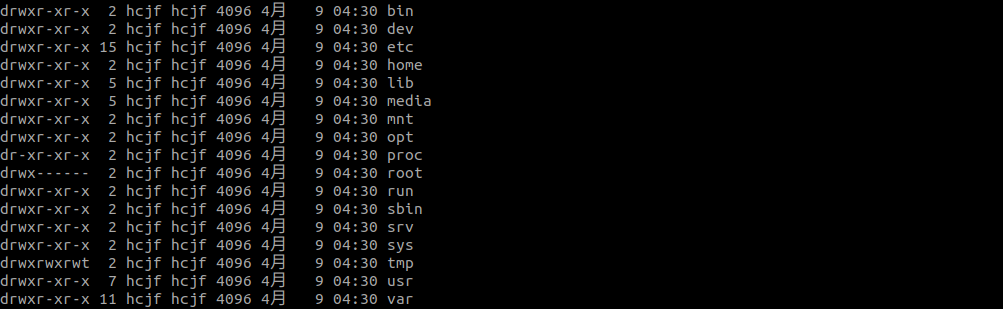
创建Dockerfile文件,编写以下内容:
1 | FROM scratch |
在Dockerfile文件路径下执行docker build -t alpine:3.9 .构建镜像:
root# docker build -t alpine:3.9 .
Sending build context to Docker daemon  31.32MB
Step 1/3 : FROM scratch
--->
Step 2/3 : ADD alpine-minirootfs-3.9.3-x86_64.tar.gz /
---> f305258a780d
Step 3/3 : CMD ["/bin/sh"]
---> Running in c22527cf1c54
Removing intermediate container c22527cf1c54
---> c9cb5e863866
Successfully built c9cb5e863866
Successfully tagged alpine:3.9
执行docker images查看镜像:
root# docker images
REPOSITORY          TAG                 IMAGE ID            CREATED             SIZE
alpine              3.9                 c9cb5e863866        40 minutes ago      5.53MB
hello               1.0                 3aedfc6e1ff4        About an hour ago   4.75kB
ubuntu-vim-2        18.04               2e2c1d07123c        About an hour ago   192MB
ubuntu-vim-1        18.04               ef1ded0d8102        About an hour ago   191MB
ubuntu              18.04               d131e0fa2585        13 days ago         102MB
执行docker history alpine:3.9查看镜像的历史操作记录:
root# docker history alpine:3.9
IMAGE               CREATED             CREATED BY                                      SIZE                COMMENT
c9cb5e863866        About an hour ago   /bin/sh -c #(nop)  CMD ["/bin/sh"]              0B
f305258a780d        About an hour ago   /bin/sh -c #(nop) ADD file:32fa3bc24e9a2340c…   5.53MB
运行:
root# docker run -it alpine:3.9
/ # ls
bin    dev    etc    home   lib    media  mnt    opt    proc   root   run    sbin   srv    sys    tmp    usr    var